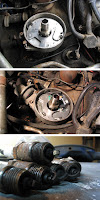
Back awhile I had an event inside of the dash wiring. I was living in Kearney at that time and so I took it down to a local place to have the wiring checked. Well I tell you I can't ever remember having the lights on the windshield wiper pod work or the lights on the heater controls so I wanted to check that out and see if I could figure it out.. Since my shop manual haven't arrived yet I worked on it blind.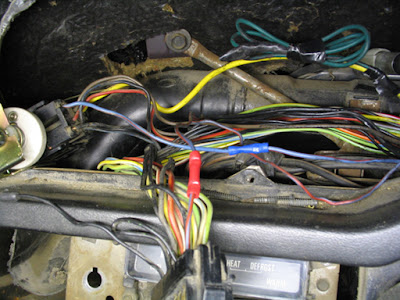
So here is what I did... The blue and red wire with the blue splice: they had the right side of the splice (that goes to the fuse block) just clipped clean. and they had the other end that comes from the headlight switch spliced to the red and blue wire that goes to the gauge cluster connector hanging in front, the wire that should have been connected to the gauge cluster block was also just clipped clean.. Then they had a wire leached onto the thick yellow wire and stuck into the headlight switch.. to provide power to the mess... since the correct wire from the fuse block was hanging free, clipped clean.. everything works great now... next thing is vacuum..
So here's the story, back around 2004 or 2005 I was at the end of my lucrative manual labor career and was getting ready to make a change. I had purchased this 71 ford Thunderbird Hardtop a few years previous and, after a few years of being unable to work on it, it had degraded till the point it wasn't fit to be used in my new career. so it was parked. Now, after a few years, I am able to pull it back outta the tree line and attempt to resurrect it. This blog will follow along with the progress from rust bucket hoopty to a (once again) nice ride.
Friday, January 25, 2008
Dash lights
Tuesday, January 1, 2008
Ignition overhaul / upgrade
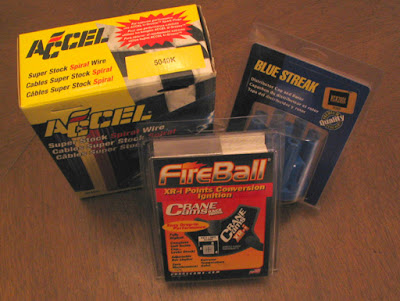 It ran, but it didn't run very well at all.. It was time to overhaul and upgrade the ignition system. This car was running on the same points system that it was when the car was produced in the early 70s and I decided it was time to upgrade to a breakerless ignition system. Also on the list were new upmarket plug wires and a new distributor cap and rotor.
Plug Wires: The first component I swapped out were the plug wires and let me tell you they weren't nearly as easy as I thought they were going to be. Part of the instructions were to "slide the boot over the wire".... heh.. "slide".. yeah right.. these plug wires aren't encased in the normal plastic or rubber like some other sets but instead silicone.. and with the boots also made of silicone and a tight fit to the wires there wasn't any "sliding" to it.. the included grease didn't do a bit of good to help them slide at all.. also bearing grease, cooking grease, almond oil,motor oil or butter had no effect. No. I didn't really try them all, but I felt like I did.. what I ended up doing is taking some fine utility wire and making a loop around the wire, then fed that wire through the boot and using a small amount of plaster dust to keep everything from sticking to each other, pulled the wire and dragged the wire through the boot.. I then just trimmed the end off of the plug wire to remove any potential of the wire having any breaks in it from the tugging it was put through. I got them cut to length and terminals clamped on and so on with a bit of effort and moved on the the next task.
Breakerless Ignition (and rotor/cap): I was really pretty impressed with the Crane Cams upgrade kit over all and you'll see some pictures of it further down.
Breakerless Ignition (and rotor/cap): I was really pretty impressed with the Crane Cams upgrade kit over all and you'll see some pictures of it further down.
The first thing to do to install the kit is to remove the distributor cap and take a 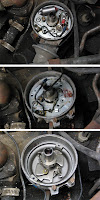 look underneath. You'll see something similar to the top image in the photo set. Don't be intimidated with any of that as we will be removing everything you see. After taking a peek and pondering the function of everything in there (I could tell you, but it really isn't that interesting) Remove the points set and the condenser. The condenser is the metal can at the top of the photo. remove all of that by the screw just beside the condenser the two screws holding the points set and the one nut that holds the black wire coming through the distributor body. Once that is out and laid aside remove the vacuum advance assembly by removing the two bolts on the front of the distributor body and the one "E" clip holding the vacuum advance arm onto the distributor plate. HOLD ONTO THE "E" CLIP.. We will need it later. (I actually misplaced mine but I had an old carburetor laying around I pirated one off of).. Push the black rubber grommet out of the body of the distributor and take the black wire out with it.Remove the wire from it's connection with the coil. Remove the two screws and remove the plates from the distributor body.. Put them in a safe place in case you ever would like to revert to a breaker system. You should now see the mechanical advance weights and springs below, take a moment to check to make sure everything is in good condition and moves freely.
 look underneath. You'll see something similar to the top image in the photo set. Don't be intimidated with any of that as we will be removing everything you see. After taking a peek and pondering the function of everything in there (I could tell you, but it really isn't that interesting) Remove the points set and the condenser. The condenser is the metal can at the top of the photo. remove all of that by the screw just beside the condenser the two screws holding the points set and the one nut that holds the black wire coming through the distributor body. Once that is out and laid aside remove the vacuum advance assembly by removing the two bolts on the front of the distributor body and the one "E" clip holding the vacuum advance arm onto the distributor plate. HOLD ONTO THE "E" CLIP.. We will need it later. (I actually misplaced mine but I had an old carburetor laying around I pirated one off of).. Push the black rubber grommet out of the body of the distributor and take the black wire out with it.Remove the wire from it's connection with the coil. Remove the two screws and remove the plates from the distributor body.. Put them in a safe place in case you ever would like to revert to a breaker system. You should now see the mechanical advance weights and springs below, take a moment to check to make sure everything is in good condition and moves freely.
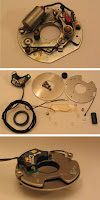 Installing Crane Cams point conversion kit: I sat down at the table and assembled the parts just so I could see for sure which bolt went where etc. before I had thread lock drying on me and stuff. Notice the bottom adapter plate with the holes in it in the middle photo. ;-)
 The first plate to go into the dist. case is the bottom plate then the plastic bushing and last the top plate. Make sure the holes in the bottom plate line up with the bolt holes in the case.and make sure the openings in the top plate line up with the holes in the bottom plate.. and make sure that both plates have the "up" marking.. umm... up. Makes things easier. Use the supplied bolts spacers and plastic washers to mount top plate and ground strap. These should be tight.. but not TOO tight otherwise the movement of the vacuum advance will be severely impaired. More about that in a bit.
Put some of the thermal grease on the bottom of the module and after feeding the wires through the hole in the case along with the new grommet attach it loosely to the top plate. This is where the instruction might use a bit more direction. They say to get the module as close as possible with out touching the cam. That is a little vague i think. What I ended up doing is cutting a bit of light weight cardboard (from a french fry container actually) and used that as a shim to place between the cam and the module. Worked pretty well. tighten everything down and reattach the vacuum advance. Route the wires from the module up to the coil and attach them per the instructions. Pull the hose off of the carb that operates the vacuum advance and give it a suck while you watch for proper movement. Mine didn't work that well.. What was happening was the top plate was right up against the inside of that grommet that went through the distributor case. I took out my top plate and used a file to remove a bit of material along the side to free that up. then used a bit of very fine sandpaper to polish the aluminum plate. Taadaa no binding. Set the timing and give it a try.
With it sitting there running if I pulled the wire off of the distributor and held it just a little bit away it would run better.. If your spark plugs are very fouled they can actually leak voltage away enough that it never gets high enough to jump the gap and make a spark. By holding the wire away and making the spark jump twice you are in effect taking away that short and making the spark build enough to jump both gaps.. So plugs were in order.
Let me tell you the plugs in this thing were the worst I think I can remember seeing plugs be. Not only black, but little chunks of black stuff on them as well.. really bad..
I got the plugs swapped and it is my joy to tell you that the Bird once again has more power at the rear wheels than the brakes can hold on to. Couldn't do that before. I have a little black spot on the driveway to prove it. Just a little... Weeeeeee.
Subscribe to:
Posts (Atom)
